以下の記事でAWSのEC2で独自ドメインを使用してWordPressを作る方法を紹介しました。
上記の記事では、AWSで予め用意されている、bitnamiにてWordPressが使用できるAMIを利用してWordPressのサイトを作成しました。
今回は上記の記事で作成したEC2に、もう1つWordPressのサイトを作成して、1つのEC2で複数のWordPressという構成にする方法を紹介します。
本記事ではサブドメインを追加する形で、新たにWordPressのサイトを作成する方法を紹介します。
サブドメインの設定
AWSのRoute53にて設定しているドメインに対して、サブドメインの情報を追加します。
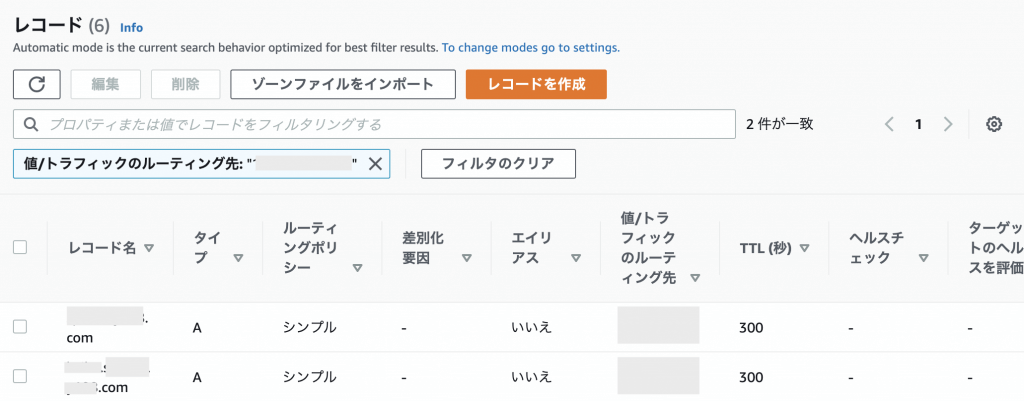
ドメインに対して、Aレコードを設定していると思います。
その情報と同じ内容で、サブドメインのものを追加します。
WordPressをインストール
まず、WordPressをダウンロードします。
WordPressのダウンロードページからwgetコマンドでダウンロードします。
本記事では執筆時点(2020年10月)の最新バージョンである、5.5.1をダウンロードしています。
wget https://ja.wordpress.org/wordpress-5.5.1-ja.tar.gzダウンロード後は、圧縮ファイルを解凍して、任意のディレクトリにコピーします。
コピー先のディレクトリは予め作成しておいてください。
tar zxvf wordpress-5.5.1-ja.tar.gz
sudo cp -r wordpress /opt/bitnami/apps/wordpress/[任意のディレクトリ]
所有グループを変更しておきます。
sudo chown -R bitnami.daemon /opt/bitnami/apps/wordpress/[任意のディレクトリ]Apacheの設定ファイルを修正
1つのEC2で複数のWordPressという構成にする時に利用するのが、Apacheのバーチャルホスト機能です。
修正する設定ファイルは3つです。
httpd-vhosts.conf
ファイルは /opt/bitnami/apps/wordpress/conf にあります。
「httpd-vhosts.conf」で複数のホストの情報を定義します。
デフォルトでサンプルが記載されているので、以下のように変更します。
まず、既存のドメイン分です。
<VirtualHost *:80>
    ServerName [既存のドメインを記載]
    ServerAlias www.[既存のドメインを記載]
    DocumentRoot "/opt/bitnami/apps/wordpress/htdocs"

    Include "/opt/bitnami/apps/wordpress/conf/httpd-app.conf"
</VirtualHost>

<VirtualHost *:443>
    ServerName [既存のドメインを記載]
    ServerAlias www.[既存のドメインを記載]
    DocumentRoot "/opt/bitnami/apps/wordpress/htdocs"
    SSLEngine on
    SSLCertificateFile "/opt/bitnami/apache2/conf/server.crt"
    SSLCertificateKeyFile "/opt/bitnami/apache2/conf/server.key"

    Include "/opt/bitnami/apps/wordpress/conf/httpd-app.conf"
</VirtualHost>
もし、ドキュメントルートやSSL証明書のファイルパスが異なる場合は、適宜修正してください。
続いて、追加するサブドメインの分です。
上記の既存ドメイン分の下に追記します。
<VirtualHost *:80>
    ServerName [追加するサブドメインを記載]
    DocumentRoot "/opt/bitnami/apps/wordpress/[WordPressをコピーした任意のディレクトリ]"

    <Directory "/opt/bitnami/apps/wordpress/[WordPressをコピーした任意のディレクトリ]">
        Options FollowSymlinks Includes
        AllowOverride All
        Require all granted
    </Directory>
</VirtualHost>

<VirtualHost *:443>
    ServerName [追加するサブドメインを記載]
    DocumentRoot "/opt/bitnami/apps/wordpress/[WordPressをコピーした任意のディレクトリ]"
    SSLEngine on
    SSLCertificateFile "/opt/bitnami/apache2/conf/server.crt"
    SSLCertificateKeyFile "/opt/bitnami/apache2/conf/server.key"

    <Directory "/opt/bitnami/apps/wordpress/[WordPressをコピーした任意のディレクトリ]">
        Options FollowSymlinks Includes
        AllowOverride All
        Require all granted
    </Directory>
</VirtualHost>
SSL証明書のファイルパスはサブドメイン分の証明書がまだないので、ひとまず既存のものを指定しておきます。
5〜9行目、19〜23行目は対象ディレクトリの権限の設定です。
既存ドメイン分は別の設定ファイルで定義されているので記載はありませんでしたが、サブドメイン分はここで記載します。
bitnami-apps-vhosts.conf
ファイルは /opt/bitnami/apache2/conf/bitnami にあります。
「bitnami-apps-vhosts.conf」は、bitnamiのバーチャルホストの設定ファイルです。
デフォルトでは、バーチャルホストを使用していないので、中身はコメントのみの状態です。
以下のように上記で修正した「httpd-vhosts.conf」を読み込む記載を追加します。
Include "/opt/bitnami/apps/wordpress/conf/httpd-vhosts.conf"bitnami.conf
ファイルは /opt/bitnami/apache2/conf/bitnami にあります。
バーチャルホストを使用しない場合は、「bitnami.conf」で「bitnami-apps-prefix.conf」を読み込んで、サイトの設定を行っています。
この記述が不要になるため、コメントアウトします。2箇所あるので、2箇所ともコメントアウトします。
#Include "/opt/bitnami/apache2/conf/bitnami/bitnami-apps-prefix.conf"サブドメインのSSL証明書を作成
前述の記事と同様に、Certbotを使って「Let’s Encrypt」でSSL証明書を作成します。
certbot-auto certonly --webroot -w [WordPressをコピーした任意のディレクトリ] -d [追加するサブドメイン] --email [自分のメールアドレスを指定] -n --agree-tos作成したSSL証明書を配置します。
ln -s /etc/letsencrypt/live/[追加するサブドメイン]/fullchain.pem /opt/bitnami/apps/wordpress/conf/certs/[任意の名前].crt
ln -s /etc/letsencrypt/live/[追加するサブドメイン]/privkey.pem /opt/bitnami/apps/wordpress/conf/certs/[任意の名前].key
配置したSSL証明書のパスを「httpd-vhosts.conf」に記載します。
「SSLCertificateFile」「SSLCertificateKeyFile」の2箇所です。
SSLCertificateFile "/opt/bitnami/apps/wordpress/conf/certs/[任意の名前].crt"
SSLCertificateKeyFile "/opt/bitnami/apps/wordpress/conf/certs/[任意の名前].key"
Apacheを再起動します。
/opt/bitnami/ctlscript.sh restart apache再起動して、何もエラーが出なければ設定は完了です。
何か設定に問題がある場合は、ここでエラーが出ますので、内容を確認して修正してください。
サブドメインにアクセス
設定が完了したらサブドメインにアクセスします。
WordPressの初期画面が表示されれば、作成は完了です。